

Phae Project Dev Log 2: Getting Famialiar with Modelling and Animating in Blender
This week I learned a ton of things about Blender and how to use it with Unity. Before this week I had no idea how to animate in Blender or how animations were set up in Unity. Here is the breakdown of this week
Wednesday: 5 hours
I did some research for the main character of my game. His name is Yorcan for now, it is based on the name Lorcan, which mean “silent” or “fierce”. I did some rough sketching (I am not good at drawing) to find some inspiration. I then went into blender and modified the template humanoid I made during the first week. This will give me a better idea of the shape that my character will have in game. Since Yorcan will always be at the center of the screen, everything in the world needs to be coherent with it. Having a simple version of the character is much better than using a random humanoid model. I also wanted to test out the Dynamic bone asset by having a dynamic cape for the character.
Thursday: 5 hours
The silhouette of the character is important and so is the color, I am trying to find a workflow that will let me create a lot of characters in a little amount of time. That’s why I am going with a simple gradient texture map (lazy unwrap) instead of a full unwrap. It is a compromise for more quantity and less detail. This is somewhat of an obligation when creating a big world as a solo developer. I will try to remedy the lack of detail by having interesting shaders, lighting and particle effects. This should permit me to take advantage of my programming skills and use as little as possible my poor drawing skills.
The unwrapping trick here is look a your character from the side (press num pad 3) and to use the “Project from View” unwrap method. In Edit mode select all vertices, press “U” and the option will show up. This will unwrap the character in a way that makes it easy to drag different parts of the mesh left and right on the gradients. If possible you want all the gradients to go from light on top to dark at the bottom. This way the character will go from a bright head to dark feet.

I made a shader, using the shader graph editor in Unity, which enables me to create a procedural texture with 8 gradients. It used channel mask and lerp nodes to replace each colors of a RGB color ID texture by gradients selected in the unity inspector. Unfortunatly it is not as useful as I wished it would have been.
Friday: 8h
At this point I tried to set up a simple demo scene.
- I decided to remake the color texture directly in krita (Krita is a free image editing software), instead of using the shader I made.
- I added collider bones on the elbows and body of the character to interact with the cape. I’m not very happy with the result but it will do for now.
- I made a simple level using pro builder.
- I made a weapon for Yorcan in Blender using the same texturing technique that I used for the character.
I followed a few youtube tutorials on the Opsive channel to learn how to equip a sword using TPC. It took a lot more time than I hoped because I ran into a few issues. Since TPC is so complex it is not easy to get things working very fast. For example I simply wanted to equip a weapon to my character I had to modify all the equip abilities of the character to match the item category that I am using for my weapon (this was a bit hidden and I did not know it had to be done), I had to change the settings on the item because it was waiting for an animation event (that did not exist) to equip. I am still having issues with positioning the weapon in my characters hand correctly because some variables are missing in the inspector (my guess is that TPC is not really ready to be used with unity 2018.3 especially with the nested prefabs workflow). The moral of the story is that I should read the documentation of TPC in more detail and I should communicate more on the TPC discord channel, they seem to be happy to help beginners like me.
Saturday: 10h
I finally got the weapon to equip correctly at runtime. It took awhile but once you understand the logic behind the choices made by Opsive it makes a lot of sense. There are still a few issues with the inspector and I sent a bug report to opsive hopefully they can fix it.
When making a big project like this it is very important to make builds quite often because even if it works in editor it might not work in build. And turns out I had worse than that the Unity froze everytime I tried to build my scene. No errors, no warnings just the unity editor not responding. It took a while to debug because I had to delete things in my scene one by one to understand where the issue was coming from. Turns out Easy save 3 was the culprit. This asset add a prefab to all scenes automatically by default. For some reason that prefab was preventing Unity to build. Just imagining having to debug this after a month of development with multiple scenes and a ton of gameobjects in each scenes, it would have been a nightmare. This is why you should always build early and often. Taking the routine of building every night is something I’ll try to do. It is also useful to build in both normal and debug mode because some errors might pop in one and not the other.
I added an enemy today, for simplicity I took my main character Yorcan and changed his color palette. This was easily done by changing the gradient colors in Krita. I then used TPC to set up the character and Behavior Designer (also an Opsive asset) to give him some AI. Using a the integration package they offer on their website I was able to get the AI running pretty quickly. If you are not familiar with Behavior Designer it is an AI solution based on a technique called behavior tree. You can read about it here In a nutshell it is an upside down tree which you read top-down, left to right. Each node can either Succeed, Fail or Wait. There are four types of nodes: actions, composites, conditionals and decorators.
- Actions are tasks that the AI will try to achieve.
- Composites are nodes that tell how to traverse the sub nodes (sequence, parallel, etc..).
- Conditionals are simple fail or succeed.
- Decorators are nodes which changes the state fail or succeed of their sub-nodes. Using these nodes with the ability to abort an actions, with conditional aborts, you can program very complex AI with a lot of simple tasks such as seek, patrol, attack, etc… Here is an example of the tree I am using for my current enemy AI.
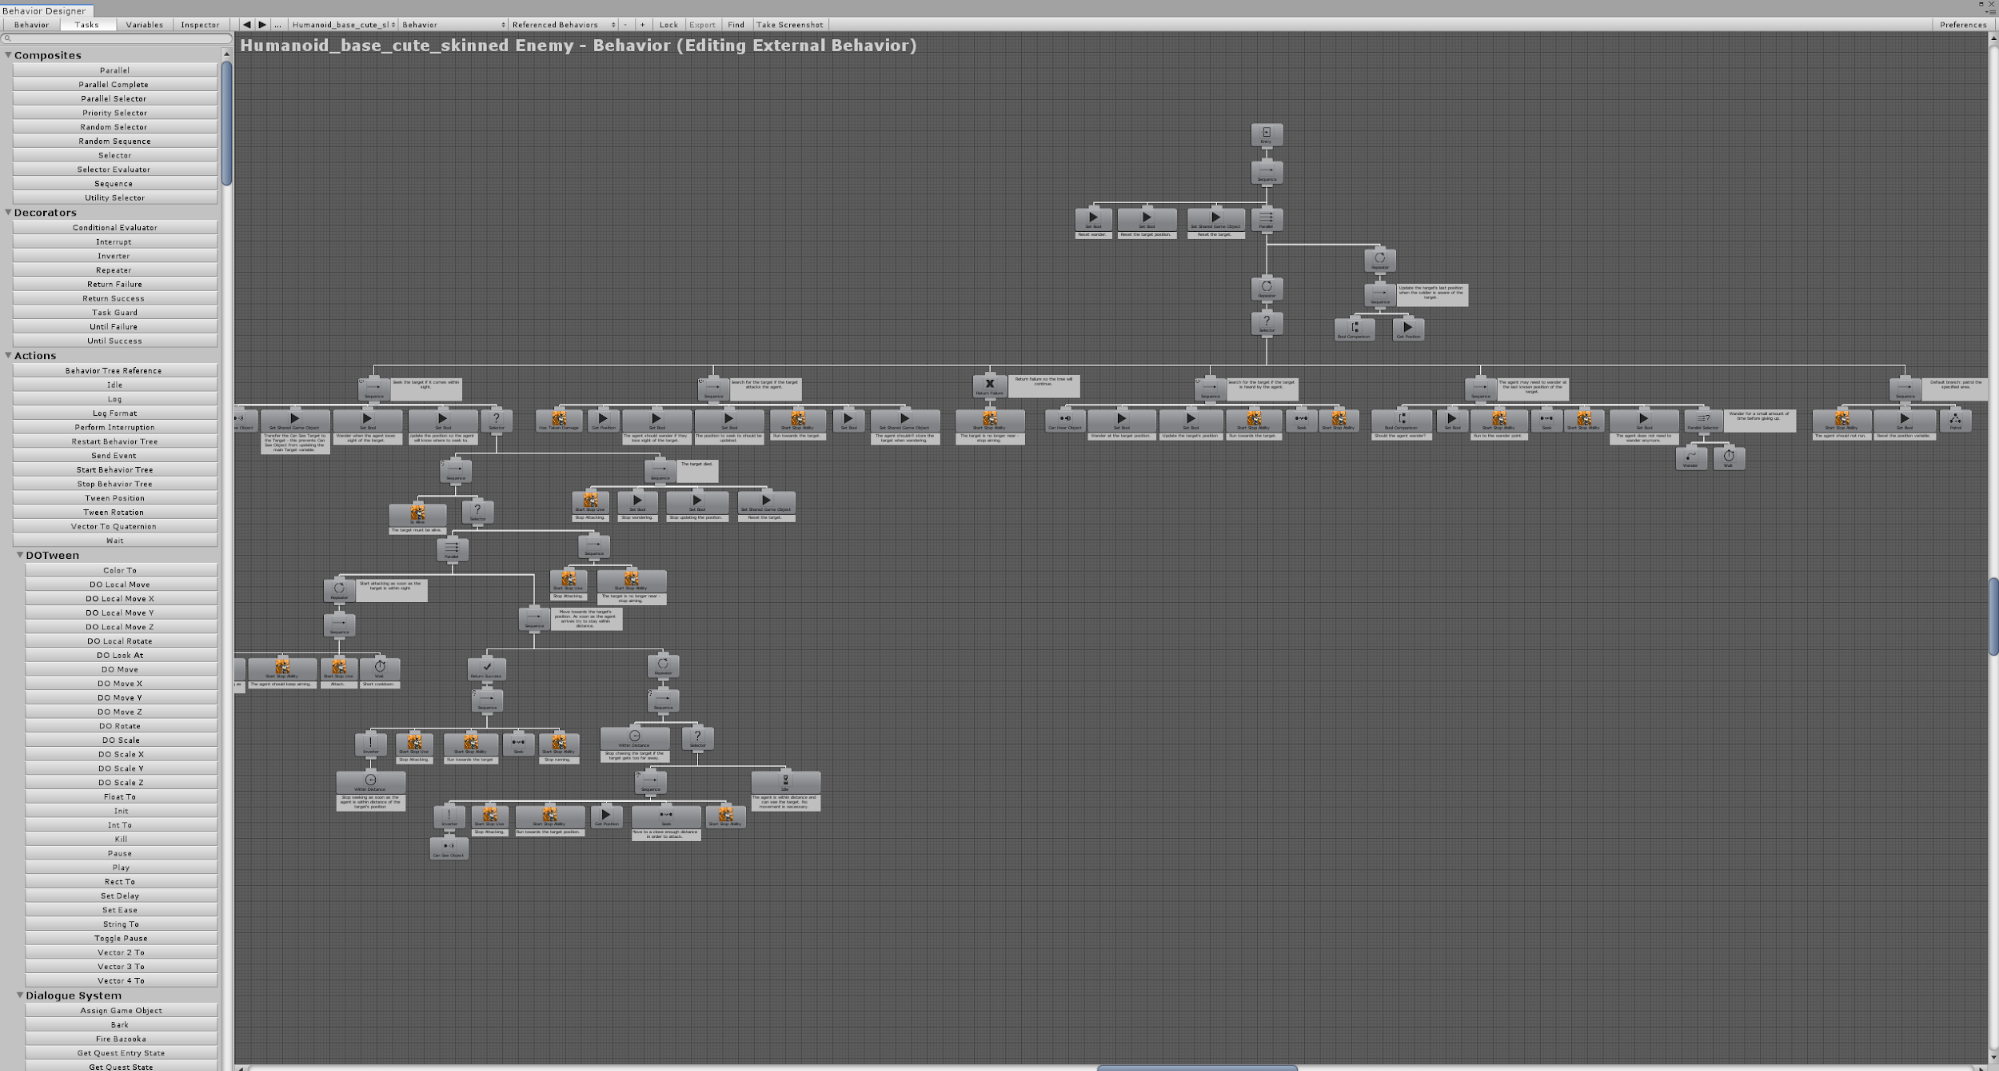
The advantage of using Behavior designer instead of creating your own behavior tree implementation (or the one provided by Unity in there 2D/3D development kit) is that you have a visual editor and debuger. While in play mode the behavior tree window will show you what task your character is currently doing. It also shows you which nodes were traversed and what were their last state: Fail, Success. It makes AI developpement a lot easier and it is less frustrating when something goes wrong because you can see exactly where it went wrong.
Since I progressed reasonably I thought that I would continue planning the future work and start fleshing out the universe of the game a little. I have a few ideas but nothing set into stone. I think the story and the lore of the game will fall into place once I get more done.
Sunday: 6h
On Sunday I was looking for a way to modify the default sword animation provided by TPC. I want my character to have more movement when he attacks, and it should be more flashy. So I played some games that have the type of attack animations I wanted. Nier:Automata has some of the best fighting animations and Ni No Kuni has the more cartoony/anime look that I am going for.
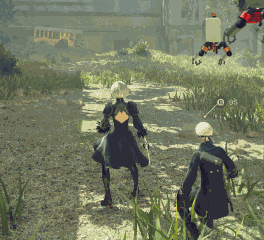
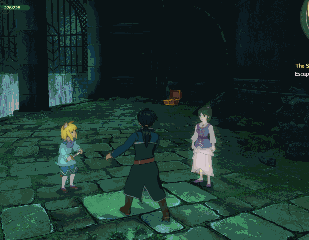
Compared to them my current combo feels wrong.
After a few hours of playing those games, I have a pretty good idea of a simple attack combo I would like to test. But there are a lot of things to figure out first. What type of animation do I use, root motion or simple? What tool do I use to animate, Blender or puppet 3D? How do I chain strikes while being able to stop at any time? I have never animated a character before so I will need to learn all these things.
After some thought I decided to rig my character in Blender for animating instead of puppet 3D because it feels like it will be better on the long term. I can retarget the animations using the humanoid rig and Unity mecanim. And blender has a more robust set of features, which means a higher learning curve but one that will be worth it on the long run. There’s also the fact that Blender has a lot of tutorials online because it is a free software, which is not the case for puppet 3D. Although I won’t use P3D for my characters I might use it for other simpler things where it would be more convenient to animate directly in Unity (I am thinking of objects in cutscenes).
Since I am going to animate in Blender I need to add a few things to my character armature/rig. There are two ways of animating a rig, forward kinematics and inverse kinematics. A simple armature is by default considered forward kinematics because each parent of each bone affect all of their children. Inverse kinematics in the other hand enables to move bones from bottom up the hierarchy. Meaning moving the hand will move the entire arm. I followed this and this tutorial to get me set up
When importing the humanoid character make sure your rig is well configured in unity. Following the tutorials above I realised that I had broken my humanoid hierarchy by parenting the hands and feet to the arm and leg IK respectively. In Blender you should always keep the hierarchy perfectly humanoid in edit mode (you can have additional/optional bones). For animation you should only use constraint that can be set up in pose mode. I use two constraints “Inverse Kinematics” and “Child of”. The “Child of” constraints is to be able to rotate my hand/foot using the IK controller.
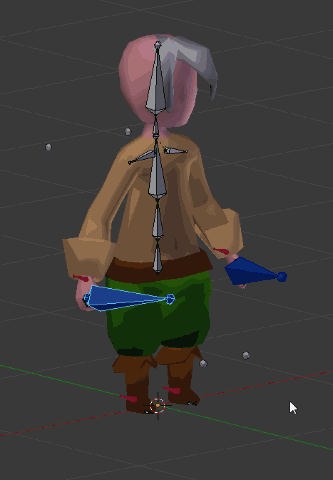
In addition to that I decided to add a special bone on each hand called Item bone. I plan on having the weapons be children of this bone to that I can animate them independently from the hand. They do it a lot in Nier:Automata where the character throw her swords around. I’m not sure how it works but this is my best guess and I’ll have to try it out.
Monday: 6h
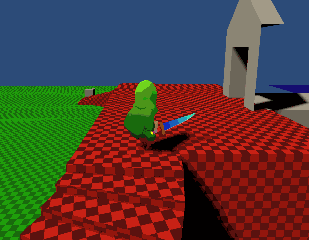
On Monday I learned how to animate in Blender. I was able to animate a simple attack sequence of two strikes. I did not realise that animating would take so much time. It took me about 3h to finish the animation sequence and it does not look or feel very good in Unity. I’ll have to tweak it a lot. Making an attack animation that feels good is hard because it needs to feel snappy (very little delay from pressing the button to reaching the point of the animation that deals damage), while at the same time it needs to be flashy. You also need to be able to stop attacking at any strike of the attack sequence or even blend between small and big attack. Anyways I will need to improve my animation skills and speed to make this project.
When importing an animation in unity, for a humanoid, there a a few things that need to be set up in the inspector. First of all I want to use root motion for my attack animation. First if your animation does not appear under “Clips” press the “+” button to add a clip. Select the newly created clip and change the choose your animation from the “Source Take” drop down. Then you can cut the animation if needed. For example I made a single long animation sequence for my sword combo, I made two clips which both use that animation a source but I cut the animation so that each clip has one sword strike. Finally you can set up the Root motion parameters. The best way to learn what they do is try all of them out. Of course you can also read Unity documentation here https://docs.unity3d.com/Manual/LoopingAnimationClips.html That’s How I got it setup:
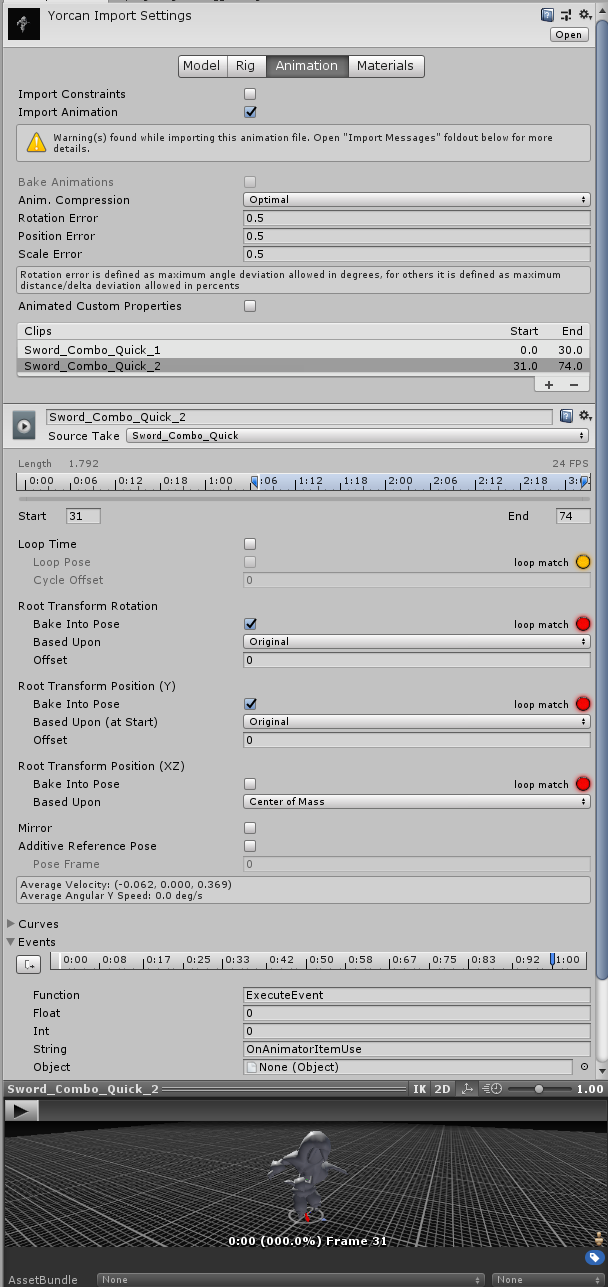
In TPC they use animation events to tell the character controller when a action has been performed. To set it up. You can learn about them here. Basicly you tell the animation to call a specific function with some parameters (float, int, string, object). “Make sure that any GameObject which uses this animation in its animator has a corresponding script attached that contains a function with a matching event name”. I wonder what would happen if you have multiple scripts with a “matching event name”? Something I should try out when I have nothing better to do.
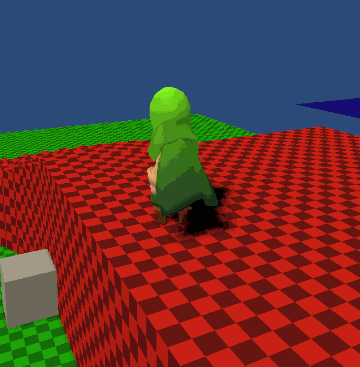
Here is the result of the knew attack animation, I will need to tweak quite a bit for it to fit my needs:
Tuesday: 7h
On Tuesday I tested the utility of the item bone. There are some issues with it but they can be mitigated a little and knowing the cause of the problem, you can design around it. So first of all I had to make the animation in Blender and turns out I needed a new pair of bone controllers. The item bone is part of the armature hierarchy and is a child of the hand bone therefore if I move the hand bone the item bone moves with it. Which means that if I want my weapon to stop moving while I move my hand then I need to break this parent-child relationship. There are two ways of doing this.
- Have the item bones be floating bones (no parents) and add a “Child of” constraint to the hand that keeps an off-set during animation/posing. Using the influence bar you can either follow the hand or move it on its own.
- Have the same bone described as above being a control bone and have “deform” item bone being an actual child of hand. You can than use a “Copy Transform” constraint to copy its transform to the control item bone when necessary. They both have pros and cons in my case. Choice one has less bones and when importing an animation in unity, the weapon will have less jitter (I’ll explain why). Choice two has a logical bone hierarchy.
In my case I will go with two, at least for now (it can easily be changed), because the logical bone structure means that I can use other humanoid animations. The weapon will move with the hand because the weapon bone will be a child of the hand. This is not the case for option one, I would need to have custom animation for everything, or the weapon won’t move with the hand.
In Blender I had to learn some new tricks to animate the weapon bone efficiently. I only need to animate the item bone controller because the other “deform” item bone has a “Copy Transform” constraint. The caveat is to keep the transform of the bone at the keyframe where we change the influence of the “Child of” constraint from 1 to 0. When changing this influence our bone goes back to its default position. The trick is to insert a “Visual Transform” keyframe so that the bone will keep its transform from where it was left of. This video explains how it is done at minute 14. I can then change the interpolation mode of the influence parameter to “constant” to snap between values 0 and 1.
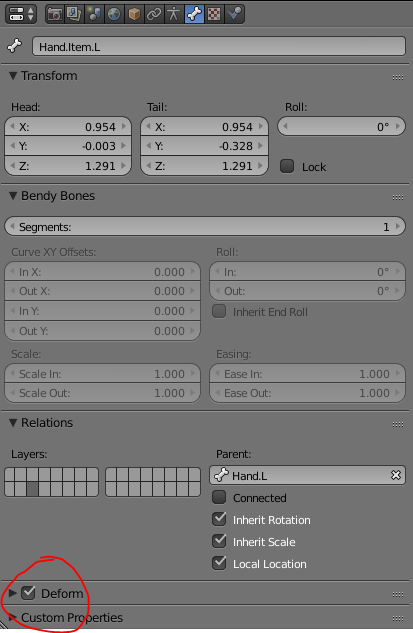
I had my animation but I ran into a few complications when importing it into unity. First my item bones were missing. For a bone to be exported into unity it must be a “deform” bone.
Then my animation was not taking into account my non-humanoid/extra bones. These bones must be specified in the inspector under the model animation tab. There is a Mask section. Select the “Create from this model” definition and under “transform” specify which are the extra bones. You will need to do so for all the animations that have the extra bone animated.
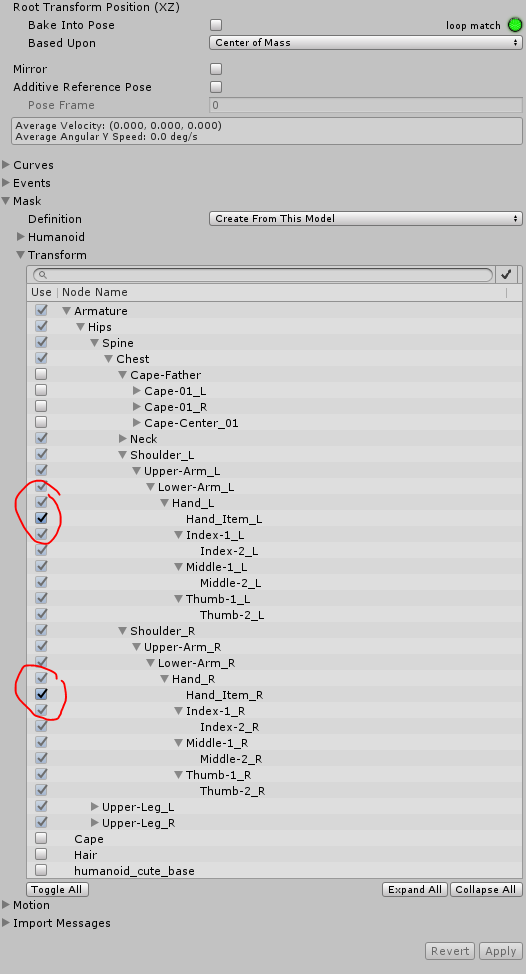
After pressing “Apply” you will see that some parameters have been added to your animations:

To look at the result I deactivated my character IK script and the arm mask. And I realised that my weapon was jittering.
The reason it jitters is because the item bone is a child of the hand bone. When Unity imports an animation it samples it to whatever fps your animation was saved at. In blender you can change it here:
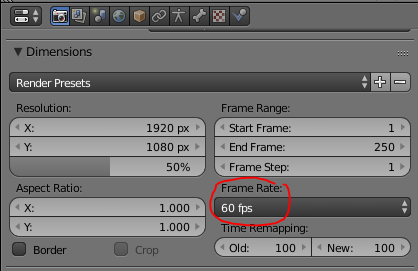
Mine was previously at 24 frames per second. Which means Unity samples the animation at 24fps. The Jitter comes from the frames which are computed in between these keyframed position. While the hand moves because of the animation interpolation, the item bone gets dragged with it because it is its child. At the same time the item bone tries to stay in place. These opposing force create the jitter. The only way to remove the jitter would be to remove the parent-child relationship when the character lets go of the weapon. For now I reduced the jitter by making the animation 60fps. It leaves less chance for unity to interpolate in between frames, because the game will run at 60fps.
In the future I might add some animation events that moves the weapon gameobject out and back in of the character hierarchy. This will work when the weapon shouldn’t move at all. In the case of having an attack that spins the weapon around, the jitter shouldn’t be too noticeable especially if I design the move animation to move the hand as little as possible while the weapon bone is moving.
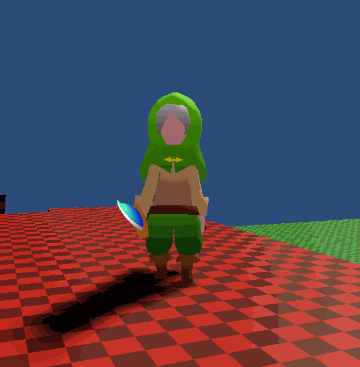
It will do for now:
Recap Tot: 47h
I progressed quite a bit this week. I learned a lot of new things especially when it comes to Blender. As someone who is a software engineer and not an artist I thought that I wouldn’t be able to model or animate at all. But it turns out that I was able to learn how to do both in a week and even though the results are not production ready they are actually quite impressive, taking into account the limited pratice I had. I’m sure that I’ll get faster and better at modelling and animating with time.
In terms of the gameplay I haven’t touched a line of code yet. I have only changed the values of the TPC scripts in the inspector. TPC is so complete that it will take a few months to really understand everything about it. But for now I am waiting for a new update that is coming shortly, where they will add some new melee weapon features. Until then I won’t program any additional stuff for the character.
I actively worked for 47 hours on the game, which is a bit too much. Considering that I am working on this game in my free time, I will need to slow down a bit or I will most likely burn out. I will try to keep my workload a fair as possible, while still challenging myself to reach a milestone everyweek.
Next week I’ll start learning another paid asset called “Dialogue System”, I would like to set up a simple conversation with an NPC and have a quest to kill an enemy.
Until next week!