
Understanding and writing shaders 1
I personally think that the thing that makes the most interesting and beautiful effects in games are shaders. Most 3D games that only use the default unity shader look a bit dull. That is why I thought it was time for me to learn more about shaders. I started going through basic tutorials that explained how lighting/shadows worked on 3D models.
Like this most basic Lambert shader:
Shader "Custom/Lambert" {

	Properties {
	     _myColour ("Example Colour", Color) = (1,1,1,1)
	     _myEmission ("Example Emission", Color) = (1,1,1,1)
	}

	SubShader {

		CGPROGRAM
			#pragma surface surf Lambert

			struct Input {
				float2 uvMainTex;
			};

			fixed4 _myColour;
			fixed4 _myEmission;

			void surf (Input IN, inout SurfaceOutput o){
			    o.Albedo = _myColour.rgb;
			    o.Emission = _myEmission.rgb;
			}

		ENDCG
	}

	FallBack "Diffuse"
}
If you are not familiar with HLSL syntax used to program unity shaders, it works as follows:
- Properties are accessable in the unity inspector. They must start with an “_”
- These porperties MUST be defined in the SubShader
- The struct Input MUST contain all the data you want to extract from the 3D model. You can find all the data you are allowed to access by reading the unity documentation.
- The surf function writes data to the surfaceOutput. Basicly you can modify the colors of the model inside this function.
The syntax is way more complicated than that but at least this gives you an idea of what the script above does.
I moved to making some more interesting effects like an outline:
Shader "Custom/AdvOutline" {

	Properties {
        _MainTex ("Texture", 2D) = "white" {}
        _OutlineColor ("Outline Color", Color) = (0,0,0,1)
        _Outline ("Outline Width", Range (.002, 0.1)) = .005
    }

   SubShader {

      CGPROGRAM
        #pragma surface surf Lambert
        struct Input {
            float2 uv_MainTex;
        };

        sampler2D _MainTex;
        void surf (Input IN, inout SurfaceOutput o) {
            o.Albedo = tex2D (_MainTex, IN.uv_MainTex).rgb;
        }
      ENDCG

      Pass {
			Cull Front

			CGPROGRAM
			#pragma vertex vert
			#pragma fragment frag

			#include "UnityCG.cginc"

			struct appdata {
				float4 vertex : POSITION;
				float3 normal : NORMAL;
			};

			struct v2f {
				float4 pos : SV_POSITION;
				fixed4 color : COLOR;
			};

			float _Outline;
			float4 _OutlineColor;

			v2f vert(appdata v) {
				v2f o;
				o.pos = UnityObjectToClipPos(v.vertex);

				float3 norm   = normalize(mul ((float3x3)UNITY_MATRIX_IT_MV, v.normal));
				float2 offset = TransformViewToProjection(norm.xy);

				o.pos.xy += offset * o.pos.z * _Outline;
				o.color = _OutlineColor;
				return o;
			}


			fixed4 frag(v2f i) : SV_Target
			{
				return i.color;
			}
			ENDCG
		}

    }
    Fallback "Diffuse"
}
The script above does a few new things. The new part is basicly the “Pass” section. This section helps us drawing the model a second time. But we draw this second model behind the first one (“Cull Front”). You might be thinking why? The way this outline shader works is that we expand the second the drawing of the so that it overflows from the orignal model edges. This overflow is the outline. The way we expand the model is by stretching the vertices in the direcion of their normals. Neet right?
But that shader might be bit more complicated than the first one but it is still fairly frequent in games. I wanted to make something weird and interesting. That’s when I learned about stencil.
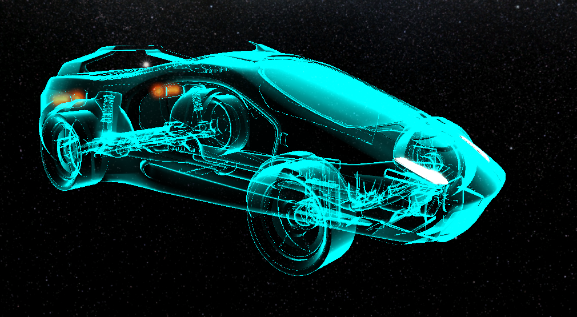
Stencil is a technique that is used to create effects like a magic lens:

Bascicly you need two objects the “hidden” object and the “lens”. They both need a stencil enabled shader.
Shader "Custom/StencilWindow"
{
	Properties
	{
		_Color("Main Color", Color) = (1,1,1,1)

		_SRef("Stencil Ref", Float) = 1
		[Enum(UnityEngine.Rendering.CompareFunction)]	_SComp("Stencil Comp", Float)	= 8
		[Enum(UnityEngine.Rendering.StencilOp)]	_SOp("Stencil Op", Float)		= 2
	}

	SubShader
	{
		Tags{ "Queue" = "Geometry-1" }

		ZWrite off
		ColorMask 0

		Stencil
		{
			Ref[_SRef]
			Comp[_SComp]
			Pass[_SOp]
		}

		CGPROGRAM
			#pragma surface surf Lambert

        	sampler2D _myDiffuse;

        	struct Input {
            	float2 uv_myDiffuse;
        	};

        	void surf (Input IN, inout SurfaceOutput o) {
            	o.Albedo = tex2D(_myDiffuse, IN.uv_myDiffuse).rgb;
        	}
		ENDCG

	}
}
Shader "Custom/BumpDiffuseStencil"
{
Properties {
_Color("Color", Color) = (1,1,1,1)
_myDiffuse ("Diffuse Texture", 2D) = "white" {}
_myBump ("Bump Texture", 2D) = "bump" {}
_mySlider ("Bump Amount", Range(0,10)) = 1
_SRef("Stencil Ref", Float) = 1
[Enum(UnityEngine.Rendering.CompareFunction)] _SComp("Stencil Comp", Float) = 8
[Enum(UnityEngine.Rendering.StencilOp)] _SOp("Stencil Op", Float) = 2
}
SubShader {
Stencil
{
Ref[_SRef]
Comp[_SComp]
Pass[_SOp]
}
CGPROGRAM
#pragma surface surf Lambert
sampler2D _myDiffuse;
sampler2D _myBump;
half _mySlider;
float4 _Color;
struct Input {
float2 uv_myDiffuse;
float2 uv_myBump;
};
void surf (Input IN, inout SurfaceOutput o) {
o.Albedo = tex2D(_myDiffuse, IN.uv_myDiffuse).rgb * _Color.rgb;
o.Normal = UnpackNormal(tex2D(_myBump, IN.uv_myBump));
o.Normal *= float3(_mySlider,_mySlider,1);
}
ENDCG
}
Fallback "Diffuse"
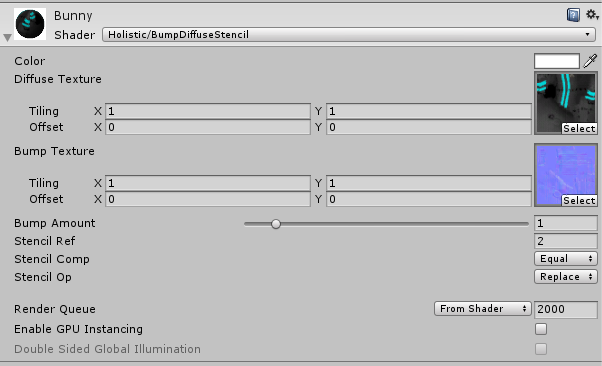
}The “hidden” object, in this case the bunny, can be set up as so:
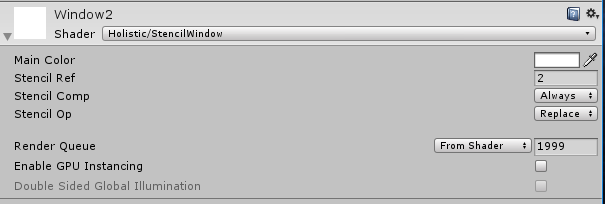
And the “lens” object, in this case the window, can be set up as such:
Since the Ref integer matches it will be possible to see the bunny only through this window.
I learned a lot about computer graphics by following shader tutorials online and I encourage you to do the same. Even if you are not an artist or a programmer you will learn how things are drawn on the screen and it will help you analyse games on a more technical level.